| Overview of the wiTECH 2.0
Introduction
If you are new to the wiTECH 2.0 diagnostic application or simply need a refresher, then this is the place to start. This article contains all the information you need to get you started with the application.
Get Familiar with wiTECH 2.0
The user interface for wiTECH 2.0 targets mobile platforms, but it is usable from any environment through one of our supported browsers.
You will discover that the majority of the features you want to access may be found within two primary views: Action Items (the default view after selecting a vehicle) and ECU Home. Once you become familiar with these two primary navigation screens, you’ll be ready to dive into the
specifics contained in the other sections of this article.
Action Items Screen
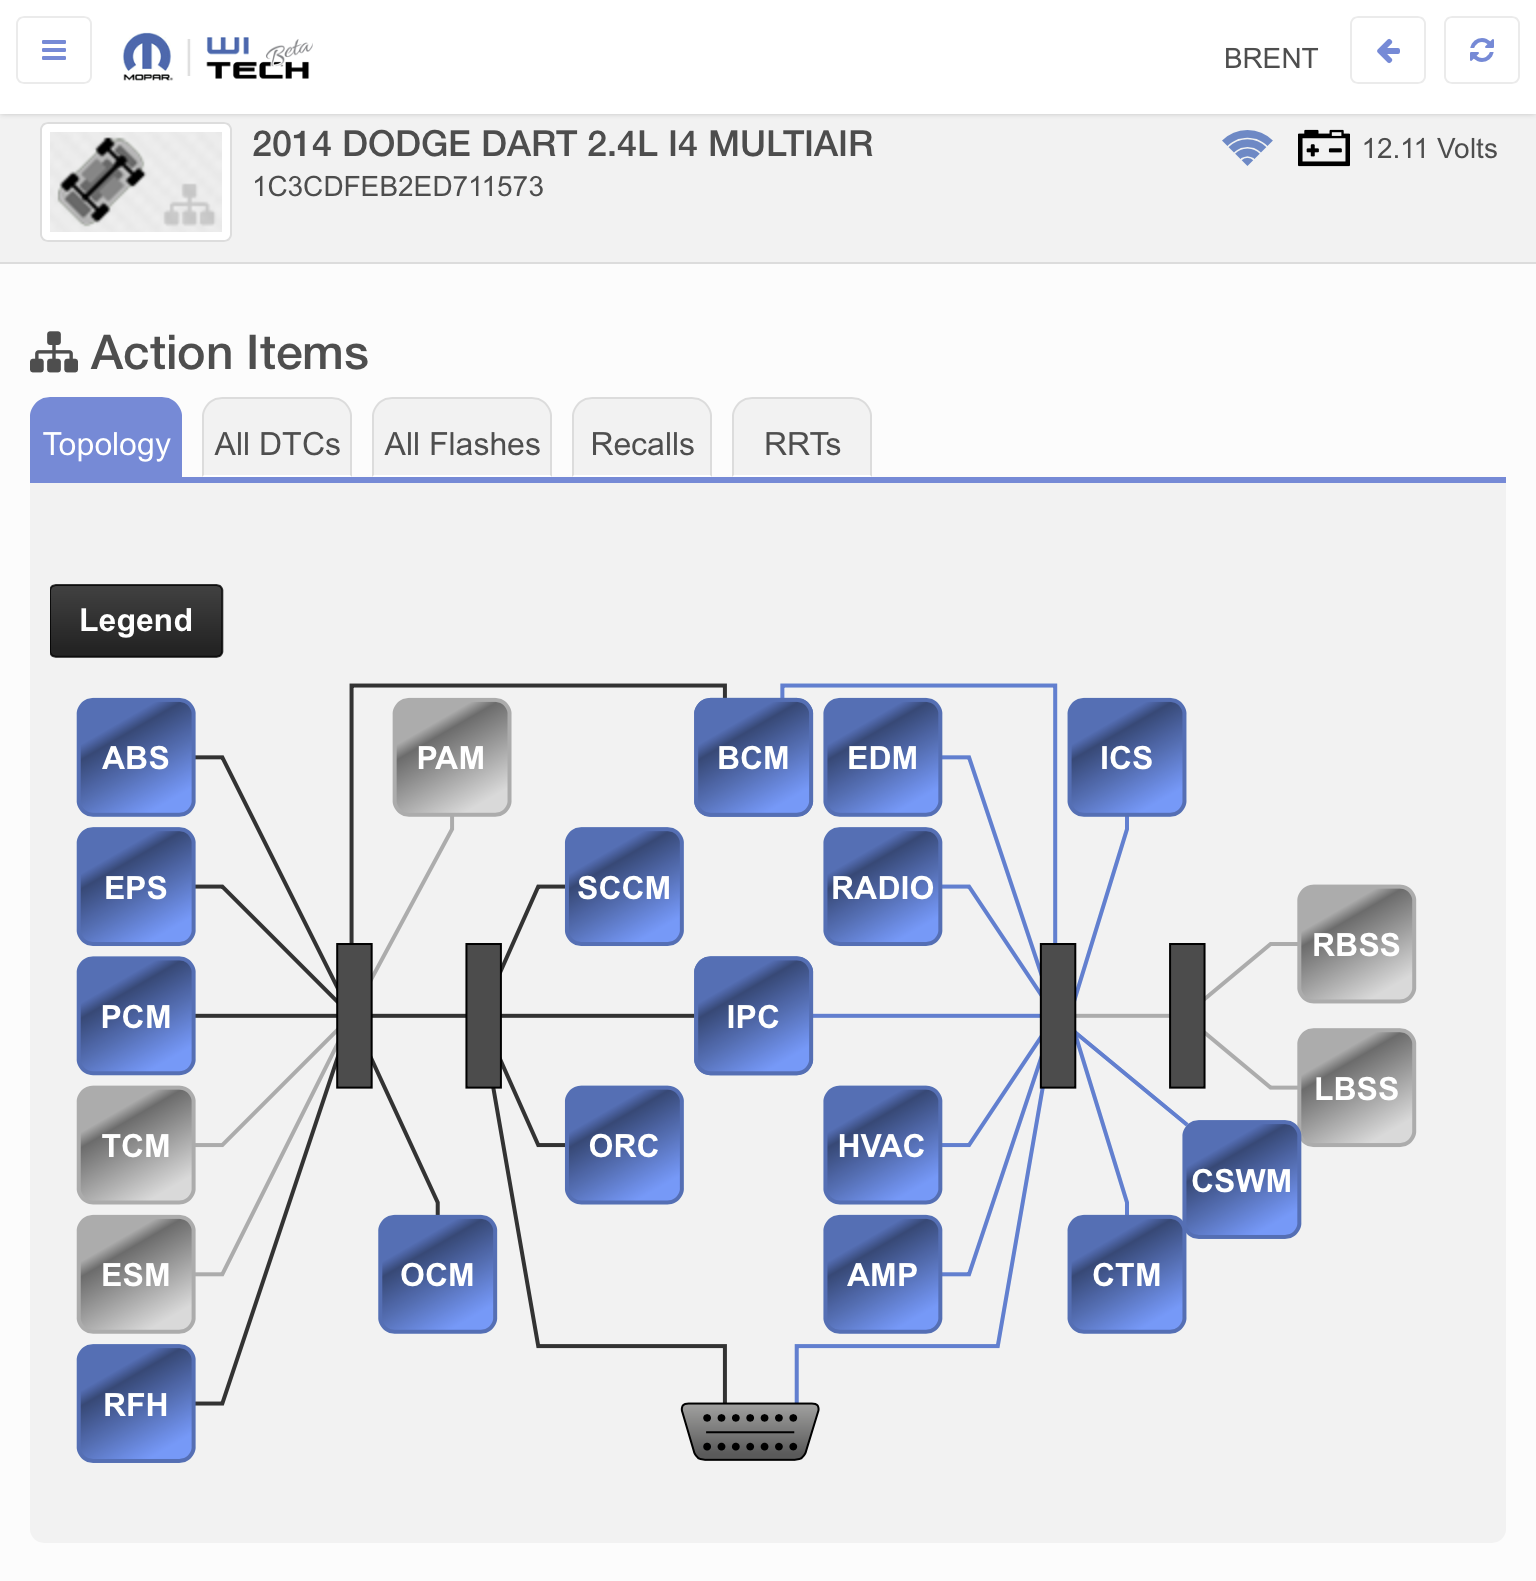
Actions Items contains access to critical information that will give you a good idea of the overall health of the vehicle. It displays the vehicle topology, lists all DTCs set in the vehicle, lists all out-of-date ECUs and their associated flash information, and lists all service actions
pertinent to the connected vehicle.
ECU Home Screen
ECU Home contains access to all the operations you can perform within the scope of a targeted ECU. Here you may flash ECUs, view and graph data, read and clear DTCs, invoke actuators, run misc. functions and system tests, and view configuration and other specific ECU detailed information.
Understanding the Vehicle Topology
The vehicle topology is given a prominent place in the application because of its ability to convey a large amount of useful information quickly. For example, because it is color-coded and illustrated with easily recognized icons, with just a glance a user is able to tell which ECUs are built and not built, which ECUs are responsive and not responsive, which ECUs have DTCs set, and which ECUs are out-of-date.
The topology also serves as the primary means of navigation into an ECU. Simply select the ECU in which you’re interested and you’ll open a view in which a number of ECU-specific operations are available.
Reprogramming an ECU (Flashing an ECU)
The wiTECH 2.0 system has expended great effort to streamline the entire flash process including marking each ECU that is out of date with a lightning bolt icon and making all associated service documentation immediately available.
Flashing an ECU is a simple three-step process:
1. Look for ECUs marked as out of date
2. Read all pertinent service information
3. Flash the ECU
Note: There are two routes from which you may initiate a flash: by selecting an out of date ECU from the topology in Action Items, or by selecting a flash from the list on the All Flashes tab in Action Items. Aside from the starting point the entire process is the same. This article follows the route that begins from the topology.
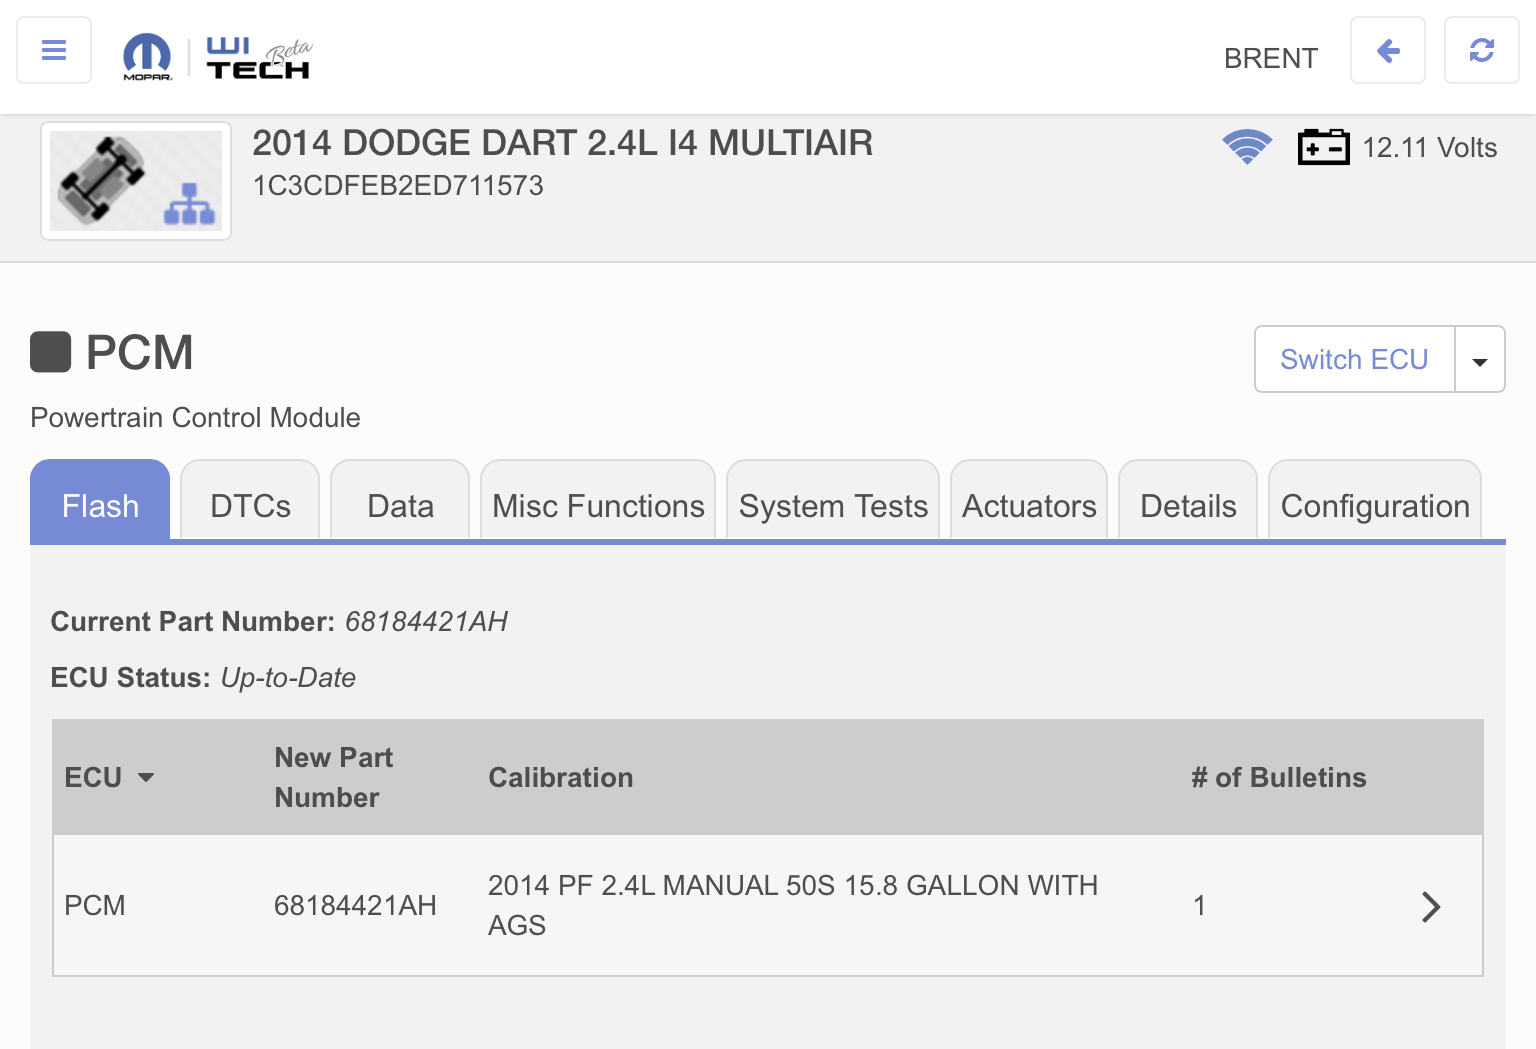
Begin by selecting an ECU that is marked with a lightning bolt icon, indicating that it is out-of-date. Then once at ECU Home for the targeted ECU, select the Flash tab.
Note: Check the Battery indicator in the heading to make sure the battery has enough power. You may wish to install a battery charger to make sure that the vehicle will stay on for the duration of the flashing process.
Be aware that all the Service Bulletins relevant to the flash is available below the flash list.
Note: All service bulletins relevant to the flash are listed, not just the most recent flash. This allows users to see all service bulletins relating to a particular problem.
Service bulletin details such as ID number and description appear in the list for an easily grasped overview, with the complete document appearing in a new browser window or tab upon selection.
Note: Read service bulletins carefully to make sure that the ECU flash is appropriate for the vehicle you are servicing.
Once you’ve finished reading the service information, and confirmed that the ECU flash is appropriate for the connected vehicle, begin reprogramming the ECU. Status messages conveying step-by-step instructions or the flash progress will follow.
Working with DTCs
Reading DTCs is simply a matter of going either to the DTCs tab in Action Items or to the DTCs tab from within a targeted ECU. To filter the list of DTCs, click on the All, Active, Stored, or Pending controls above the DTC list.
Clearing DTCs is just as easy: click on the Clear All DTCs button and you’re done. Note that as soon as the process finishes, wiTECH 2.0 again scans the vehicle so any active or pending DTCs will reappear in the list.
Viewing Service Actions
wiTECH 2.0 prevents you from wasting valuable time looking for service information by gathering it together for you. To view RRT or Recall documentation, simply go to the desired tab in Action Items and make your selections from the list. Documentation will open in a new browser tab or window.
Running Customer Preferences
Running a customer preference is as simple as selecting it from the list and following the on-screen instructions. Return to the selection list by exiting the preference.
Running Vehicle Preparations
Running a vehicle preparation is as simple as selecting it from the list and following the on-screen instructions. Return to the selection list by exiting the preparation.
Viewing Data
If you want to view data for an ECU, go to the Data tab from ECU Home. There you have the option to view data in either a tabular or graphical format.
To locate items quickly, make use of the search or filtering controls at the top of the data list.
To graph data, select the desired items and press the Graph button. The graphs will appear in a new window. If you have graphed more than one item, all graphs will appear on screen. In this view you have controls to hide and show data items, zoom in, zoom out, pause, and specify a range of data.
Running Actuators
To start an actuator, simply select the targeted actuator from the list. Start options for the targeted actuator will then appear, from which you may make your selections. Once you’ve made your selections, press the Start Actuator button and your actuator will begin.
Running System Tests
Start a system test by selecting it from the list, and then follow the on-screen instructions. Return to the selection list by exiting the test.
Running Misc Functions
Start a miscellaneous function by selecting it from the list, and then follow the on-screen instructions. Return to the selection list by exiting the function.
View ECU Details
View ECU overview information by clicking on the Details tab from the ECU Home view.
If you want to view details for more than one ECU, however, you may instead want to run the ECU Details Report accessed via the menu at Reports. The advantage of this report is that it captures the desired information for the entire vehicle in one place.
View ECU Configuration Information
View ECU configuration information by clicking on the Configuration tab from the ECU Home view.
If you want to view configuration information for more than one ECU, however, you may instead want to run the ECU Configuration Report accessed via the menu at Reports. The advantage of this report is that it captures the desired information for the entire vehicle in one place.
Generating Reports
The wiTECH 2.0 system offers a variety of reports that you may view. Each report contains general vehicle information as well as content specific to the targeted report topic.
Note that while you may utilize your browser to print any page you’re on within the wiTECH 2.0 system, it is recommended that you use the Print Report button found at the top of every report header. Unlike the default print options within your browser that will print content exactly as it appears on the page (which has been designed with a smaller resolution in mind, with large fonts and finger-size row spacing appropriate to a tablet display), when you print reports from within wiTECH 2.0 it will apply styles that are geared toward the printed page.
Using Custom Displays
For the occasions when you want to view data from multiple ECUs all in one place you can make use of Custom Displays. Select the template you wish to load, and then interact with the information as you would in any data display, complete with all the filtering and graphing capabilities you’ve come to expect from wiTECH 2.0 data displays.
Viewing Inhibit Monitors
Inhibit Monitors may be accessed through the menu. Controls are provided for quickly expanding or collapsing tabular information.
Running Loss of Comm Test
The Loss of Comm Test demonstrates the responsiveness of ECUs. When you load this page, a request is sent to each ECU every 200ms. The current state is displayed along with the number of times that status has changed between responsive and unresponsive.
|